When I started blogging, I had no idea what I was doing. I was so confused with the amount of information on the internet and I was really overwhelmed with the things I had to do.
I feel you.
I am by no means an expert on this topic, but I feel like I have learned a lot these past few months trying to prepare my blog for launch, so I created this guide to help you start your dream blog in spite of the sanity level of your home right now.
But first, some friendly reminders:
DON’T BE AFRAID!
Don’t be scared into thinking that blogging is too technical and that you might not have what it takes to manage a proper blog — a profitable blog at that! But I’m telling you, if I can do it, you can most definitely do it!
This is your own little space on the internet where you can talk about anything you want. Don’t worry if you don’t think you have nothing to say, because eventually, you will realize the things you like to write about, and people who share the same insights and interests will gravitate towards your blog and will love what you have to say.
DON’T WAIT UNTIL YOU’RE READY!
I published my first blog post, how to start a blog despite overwhelm, on my mom’s birthday. It was lacking a lot of things, and I always felt I wasn’t ready to show it to anyone, but I knew if I didn’t dive head first, I would eventually be paralysed into doing it at all.
WORK AT YOUR OWN PACE!
I didn’t have a “launch date” so to speak. I was doing things slowly (at a snail’s pace), trying to teach myself as I go. And like everything that comes with self-learning, I was kind of doubting myself and feeling incompetent. Being a mom means there’s a lot of “life” happening behind the monitor too.
I was absent from the blogosphere for most days of the week, and when I do have time to work on it, I end up spending it on technical issues. This is why I consider the first month as my trial month.
I decided to write a blog progress report to document the 10 ways my blog was not ready for launching, and how I plan to fix it.
This post contains affiliate links for your convenience.
For more information, see my disclosures here.
BLOGGING IS A WORTHWHILE EFFORT!
If you are the least bit interested in blogging, you would know that blogging eats up a LOT of your time, and I have to make certain that I emphasize on A LOT! That’s why as a mom who can’t seem to manage her time right, I found this book life-changing.
Time spent on blogging could otherwise be spent on managing your home, nurturing your family, so why bother?
- You can help augment your family income. There are mommy bloggers who make $1k-$100K a month. It’s hard to believe, but blogging really does earn you money if you know how to go about it. When I received my first affiliate income of $12 (first week of May —my first real month of blogging), I was over the moon happy about it because it cleared up any doubts that I could earn any money at all from writing about things that I was interested in.
- Blogging is your calm space. It empowers you and gives you the confidence to be who you are. You can share anything and everything that makes your heart go pitter-patter. Think of it as your own world where you can shape things how you want it. You can be as real as you want to be, or create a whole new other personas if you’re into that sort of thing.
- You can influence people. When you write amazing content, you become an inspirational or authoritative figure on your topic. You earn the respect, trust, and support of like-minded people, and have a whole community connecting with you and building you up.
I could write more, but if you’re reading this, then I’d assume that your already interested in blogging for profit.
These are just 3 of my primary reasons that push me to blog, and so far, I am loving every bit of it. But of course, the first step is always the hardest part, so without further ado, let’s begin!

Let me know if you encounter any difficulties with setting up your profitable blog so I can lend a hand, ‘mkay?
BLOGGING TERMS
To start off, I’m listing some blogging terms that you’ll need to know because you’ll be hearing these words a lot when you are starting a blog. I’ve included the ones I personally use if you’re interested.
- Web Hosting (Bluehost) = is the LAND from which you will build your “house”
- Blogging Platform (WordPress) = your HOUSE
- Domain Name (Namecheap) = your ADDRESS
- Theme = The STYLE of your house
- Parent Theme (Genesis Framework) = Your house’s ARCHITECTURE (placement of walls, outlets, etc)
- Child Theme (Foodie Pro) = Your house’s INTERIOR DESIGN (paint, furniture, etc.)
- Plug-in = your MODULAR cabinetry and other READY-MADE stuff in the house so you can get the look or function you want without messing with the foundation of the house
FREE PLATFORMS AND WEBHOSTING
There are free platforms you can definitely use when you’re just thinking of blogging for fun (and not earn from it). Here are just some of them:
There are more out there, but these are just those that I personally know and have used in the past. If you’re blogging for money, then I would recommend that you purchase a self-hosted site.
WHY YOU NEED A SELF-HOSTED SITE
“…but I don’t want to spend money on my blog!”
I hear you.
As a mom, money is a serious matter and the word “free” is like a neon sign with my name on it.
I hold on to my family’s finance— and my own mommy budget— with a tight fist.
Believe me, I’m the type who will try and find other means to get the job done without shelling out, even if I have to scour the internet world for all the free services.
But as I learned through years of failing at blogging, free in this case is a very bad idea.
Why?
- You have no control over your own blog. I’ve heard people have had their profitable blogs taken down for no reason. You don’t want to risk your hard work going down the drain without any warning for something avoidable as not owning the space.
- Capabilities on those sites are limited. With a free platform, you are limited to only a pre-selected set of free themes. Often times, you cannot change the appearance or layouts on your site which is a huge deal as viewers prefer sites with the author’s personality.
- It is harder to monetize! I know, because I’ve tried them for several years with nothing to show for! This time around, with my own domain name, a good hosting plan, and a beautiful and efficient WordPress theme, I was able to make $22 on the first week of my “official month” of blogging. Besides, most advertisers and brands are wary of free blogs because they don’t see them as professional enough to work with.
If you are serious about creating a profitable blog, immediately treat it as you would a brick and mortar business. You can’t build a reputable business on the side of the road and expect customers or potential sponsors to take you seriously.
Don’t waste your valuable time with a free site.
Blogging is the only business I know that requires very little capital with a huge payoff!
HOW TO START BLOGGING IN 5 EASY STEPS
STEP 1: PURCHASE YOUR DOMAIN NAME
Decide on the right domain name for your blog. It should:
- be something you like and love
- give the audience a clue as to what your blog is all about
- be easy to say, write, and remember (no weird spelling or special characters)
Once you’ve come up with an idea that is available, register your domain. You could choose to register it where you purchase your hosting package (We’ll talk about setting up hosting after this). Another option would be to purchase your domain name separately from your hosting package, which is what many professional bloggers do (including me) because it adds another layer of protection.
If you want to register your domain separately from your hosting, I recommend using Namecheap. You can purchase your domain here for a reasonable price. While I used to buy from another company to save a couple of cents, the customer support pales in comparison to what Namecheap provides. When I encountered some technical issues (non-techie mom here), Namecheap literally took seconds to resolve it. I love them.
There’s another one recommended by a professional blogger that seemed promising, but the .com I looked at was $12.99 when it was only $10.88 on Namecheap. Plus, Namecheap usually has a coupon code available so you can knock the price down a bit further. Just google “NameCheap promo code” with the current month and year to find one.
STEP 2: PURCHASE YOUR HOSTING PLAN
How to start blogging with BLUEHOST hosting
Bluehost is touted to be one of the best hosting companies out there, and for good reason. I chose them because they are known to deliver quality service for a very competitive price.
There are some who would argue that Bluehost is not really that good, but for the kind of pricing that they offer, I would disagree. The early days of blogging are tough and getting traffic is painful. You won’t expect a profitable blog so early into it, so I think Bluehost is just perfect for that point in time of your journey.
Why choose Bluehost?
- they are recommended by WordPress for years now
- they have a stable, tried & tested, reliable service
- they have good site security
- trusted by most professional bloggers
- they offer amazing customer support 24/7
- most competitive prices on the market
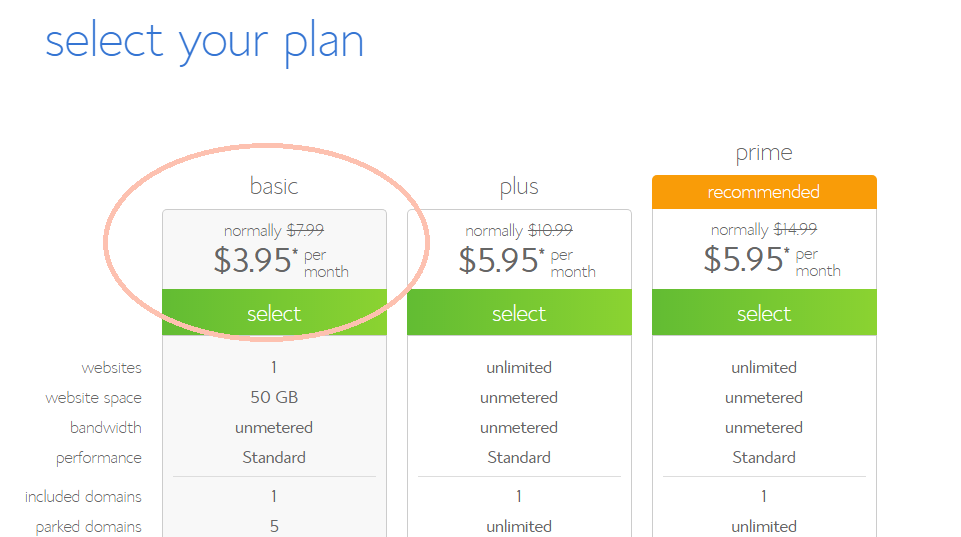
Bluehost offers three options for hosting plans. When you’re just starting out your profitable blog, you should go with the “Basic plan“ for just $3.95 per month and upgrade as your site grows. Use this link to get it at that price.
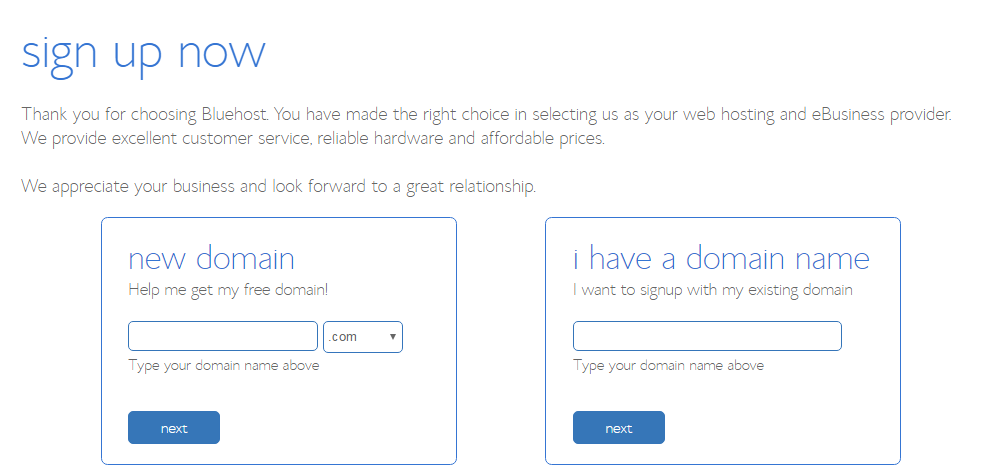
To register your domain name with Bluehost, enter it under the “new domain” box and click “next.” If you have registered a domain name with Namecheap, enter it under the “i have a domain name” box and click “next.”. Complete all of your account and contact information
Just below is the “package information” section. You get the cheapest monthly rate by pre paying 36 months for the hosting. This was a bit of an investment for me, but I thought it is essential for a profitable blog after all. And I can get it back anytime with their money-back guarantee, should I fail at blogging *knock on wood* in say, 3 months time, and cancel my 3-year account with them, they’ll return to me the difference).
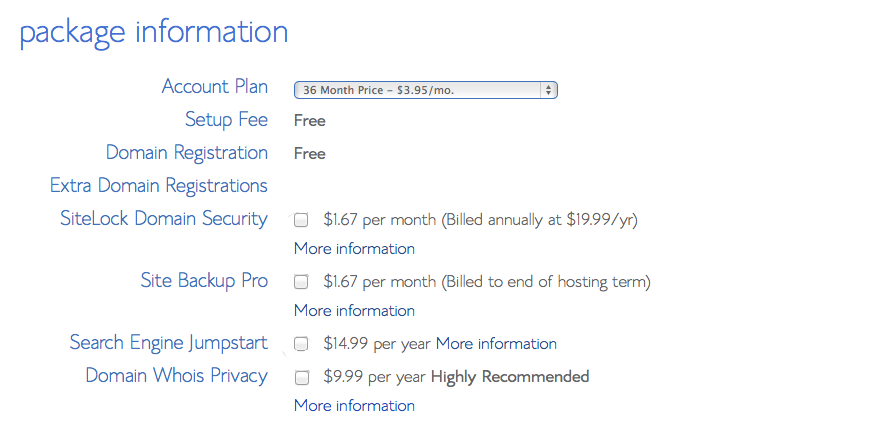
You’ll see that there are extra services available too, but you don’t have to worry about those yet because you can always add them as you grow — unless you can afford to (I recommend the Domain Whois Privacy).
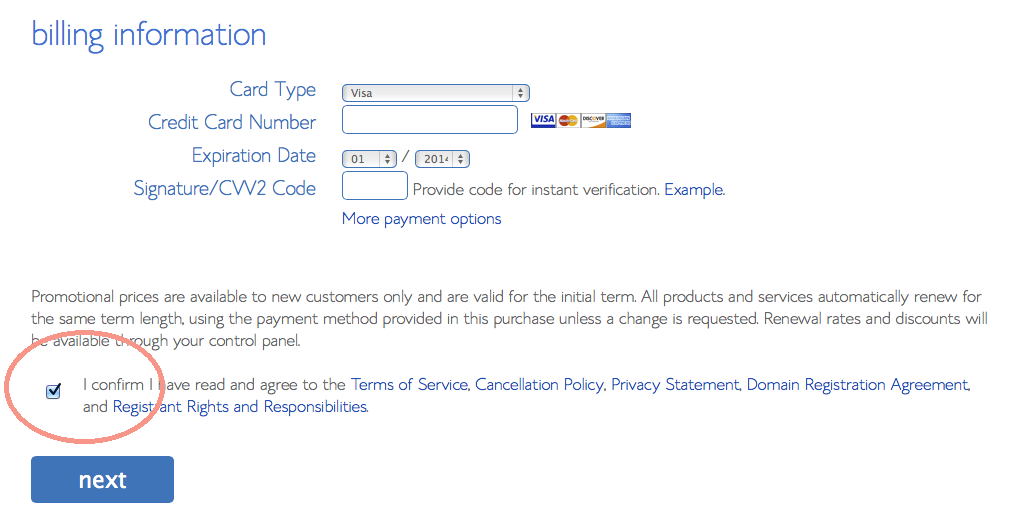
Now you’ll be asked for your billing information. Agree to their service agreements and click “next.”
You’ll be taken to another page which may offer other services, click “complete.”
Create a new password, and log into your new account under the “hosting” option.
STEP 3: CONNECT YOUR BLOG TO YOUR WEB HOSTING
Regardless of your domain registrar or web hosting companies, this process will remain the same (although their locations will be different).
After getting your domain from Namecheap, you will need to change the nameservers to point to Bluehost. so that they will work together
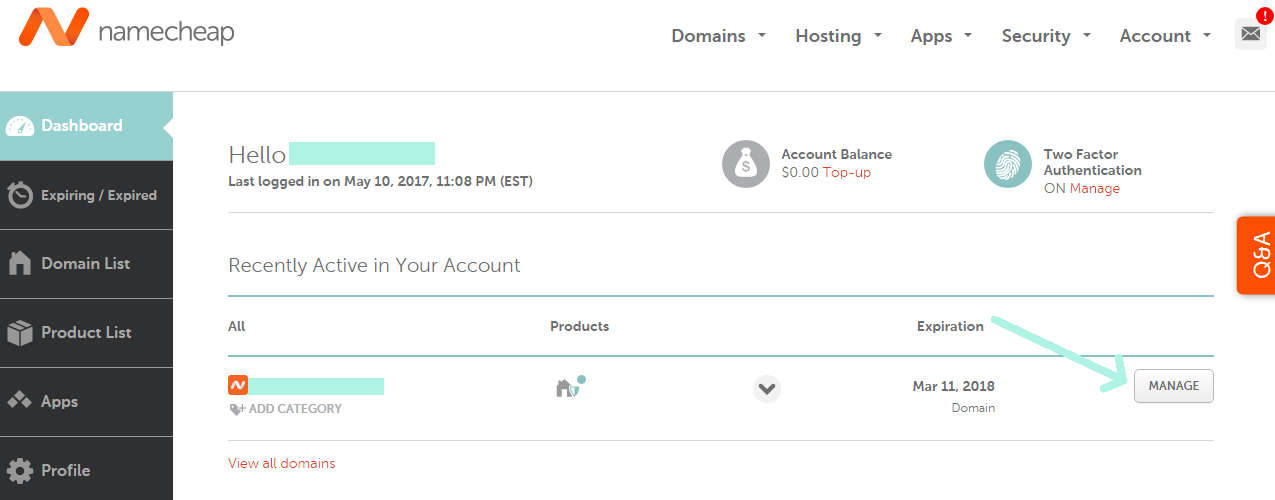
Log into your Namecheap account and click on “manage” for the domain you want to point to Bluehost.
When it takes you to the domain management page, look for “NAMESERVERS” and in the drop-down options, click “Custom DNS“.
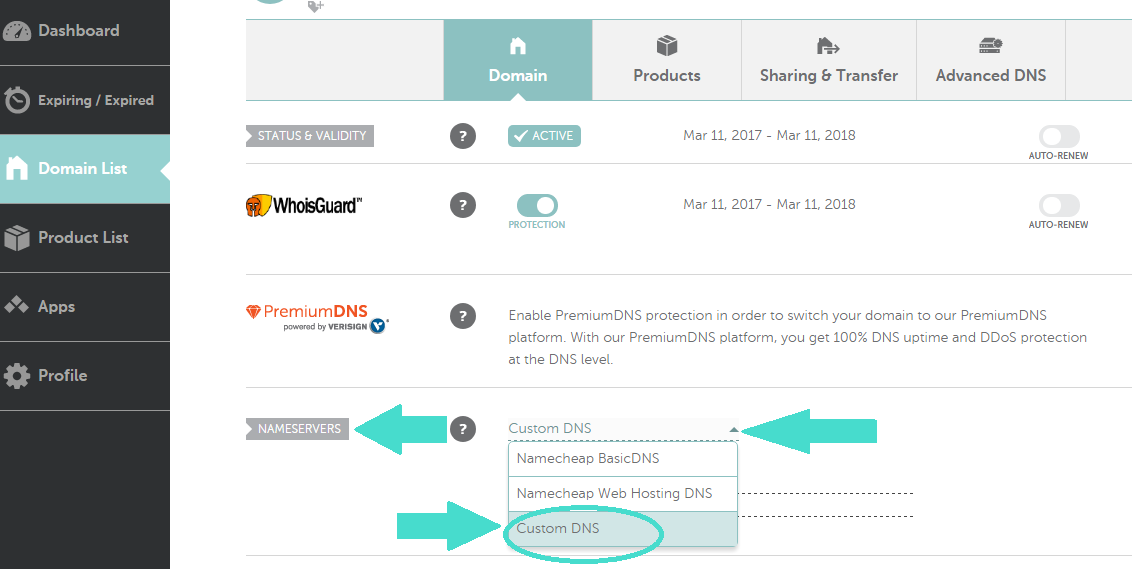
On the Nameservers tab, add the following Bluehost nameservers:
- ns1.bluehost.com
- ns2.bluehost.com

When done, click on the checkmark on the upper right of the tab to save.
Done!
Note: sometimes it takes time for any changes to take effect, so keep calm and check again later.
STEP 4: INSTALL WORDPRESS
Immediately after you set up your domain and hosting, you can set up WordPress!
A quick way to do this is to take advantage of Bluehost‘s one-click WordPress installation, or ask Bluehost to install WordPress for you!
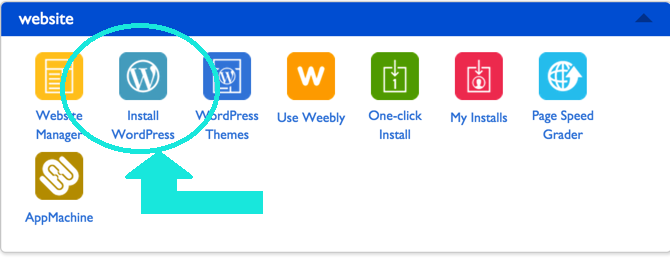
If you want to install WordPress yourself, Click the “install WordPress” button at the bottom of the screen:
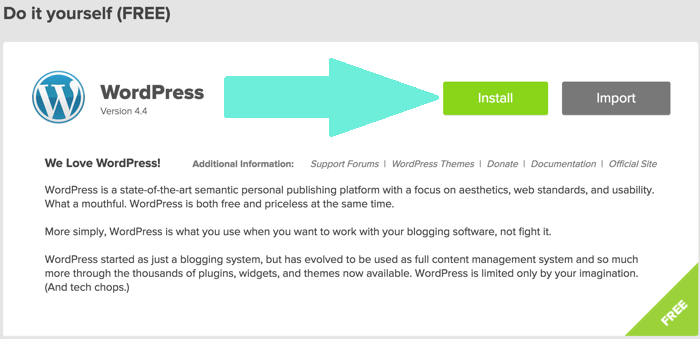
click on “Install”:
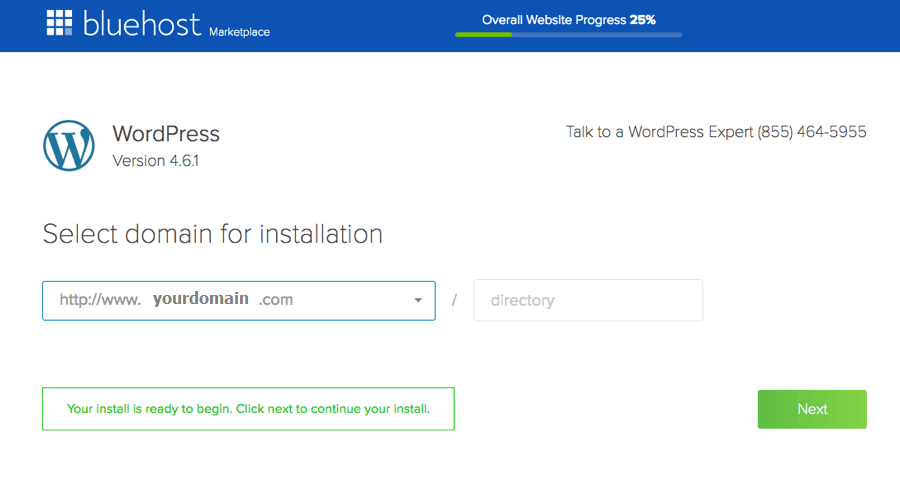
Select the domain where you want to install WordPress and click “next“:
Click on “Show advanced options” and select your WordPress username and password for your login
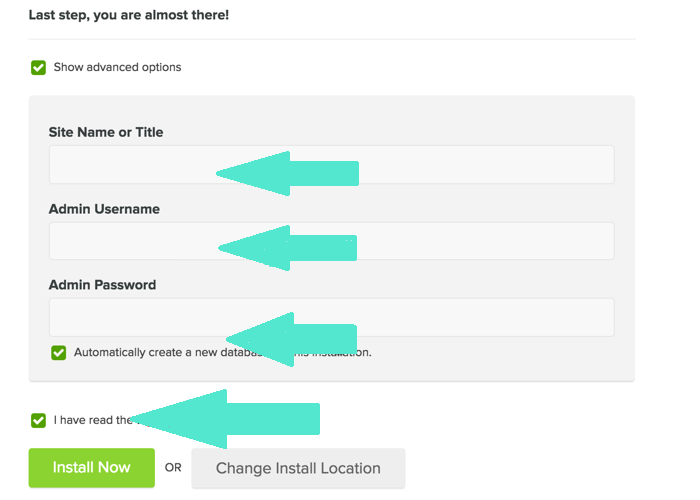
Wait until you see “Installation Complete”. You’ll be sent an email to your registered email address containing your login and password information.
And, if you ever have any hiccups, Bluehost has a superb 24/7 customer service who can take care of you and your dilemma.
Great! You’re profitable blog is all set up!
STEP 5: ACCESS YOUR BLOG
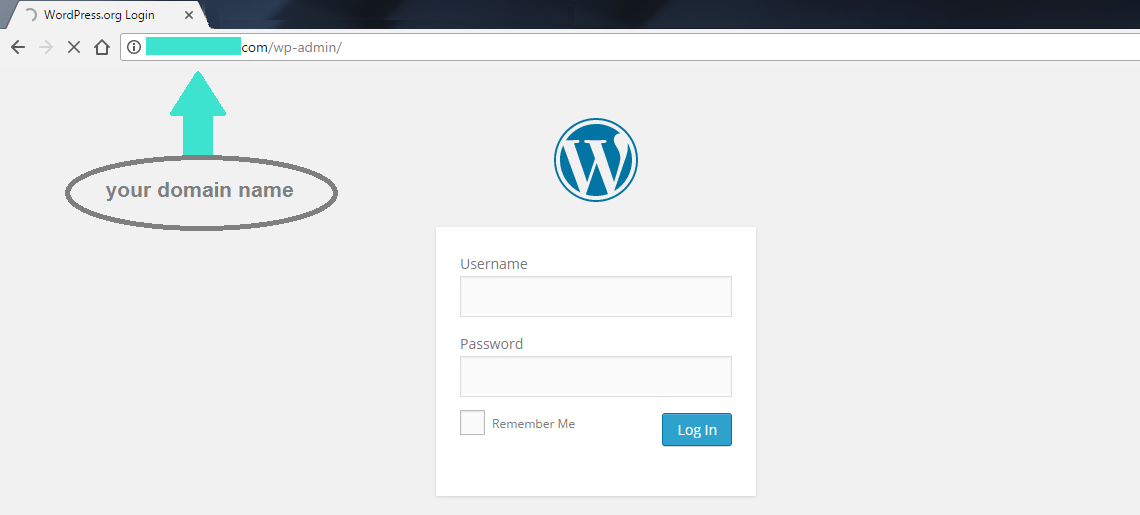
Now it’s time to sign in to your WordPress dashboard by typing in https://YOURDOMAIN.COM/wp-admin.
Use the username and password you just created in the WordPress installation steps above.
If you’re new to WordPress, you might feel intimidated by its dashboard. Keep calm! You’ll eventually familiarize yourself with it very fast. Take time to navigate it so you can learn all the options you have on the sidebar. From here, you’ll be managing your blog posts and comments, customizing your blog’s theme, adding plugins, and more.
BONUS STEP: DESIGNING YOUR BLOG
This is the fun part!
Let’s add color to your profitable blog!
To choose a new theme, click Appearance > Themes.
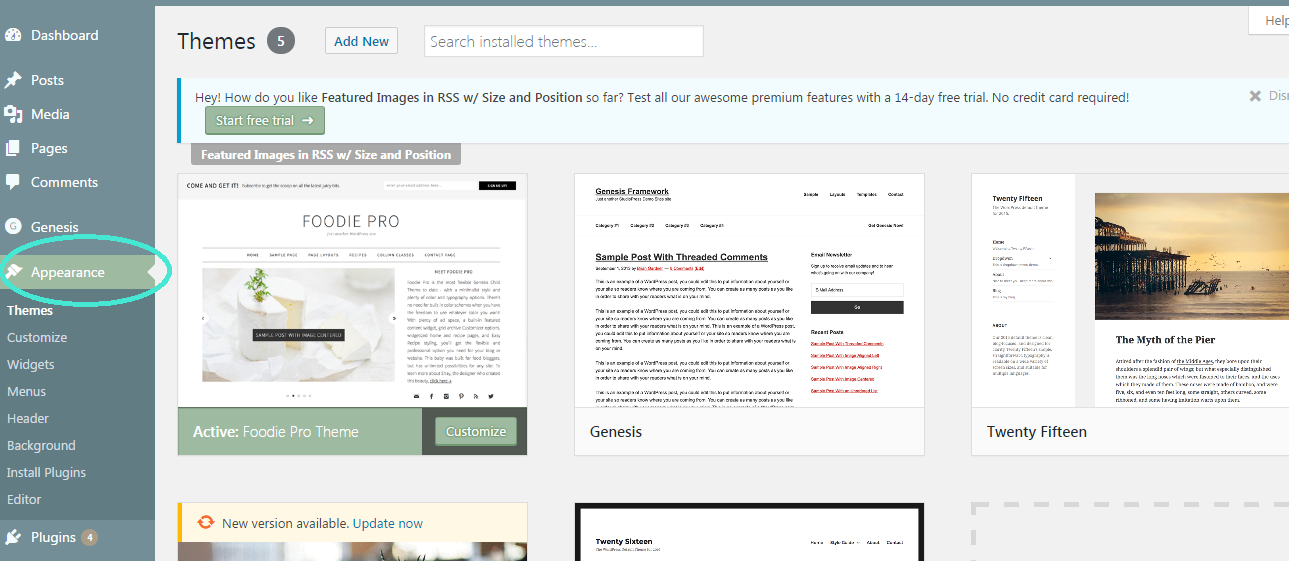
You can install a free WordPress template. But I highly suggest that you check out premium ones.
There are 5 things I require when looking for a good child theme for a profitable blog:
- It should be clean and easy to navigate
- It should be reasonably priced
- It should reflect my personality and what my content is all about
- It should have a good support team backing it up
- It should be a fully responsive theme
I have the Foodie Pro theme, and I love it because it’s versatile! I can create a professional looking design and change things as I see fit without worrying if the theme would be able to support the changes I wanted to make. I change my mind a lot, so this is truly a great feature for a profitable blog.
What now?
Useful Resources For New Bloggers
If you’re like me who’s constantly lost in the sea of blogs and social media, there’s always room for more learning and improvement.
I started with this amazing ebook to help guide me through building my blog from the ground up. This ecourse then showed me how to earn decent income from the blog.
I’ll be adding some resources and helpful tools you might need to nurture your new profitable blog business in the near future so please subscribe to my email newsletter below this post if you want to be updated.
There is so much to learn, and I know you’ll have fun! I know I did! If you’re feeling snowed under all the information, check out my post on how I started a blog despite overwhelm.
I’m so excited for you, and to make sure that you get all the help you need, don’t forget to sign up for our newsletter so you can access any updates and freebies.
And that’s it! 🙂
If this guide helped you out, please share with your friends!
Pinning is always loved here!

